


There are a lot of reasons why you might want to share your Mac’s internet connection over WiFi, or Ethernet. You may be staying in a hotel that only allows one device to connect to their internet, or you might simply need it to test something out. Whatever your reason may be, if you’re looking to share your Mac’s internet, here is how you can do it:
1. Share WiFi from Your Mac over Ethernet
If you have a WiFi connection on your Mac, and you want to share it over the Ethernet interface with another laptop, you can do that very easily. Just follow the steps given below to set this up on your Mac:
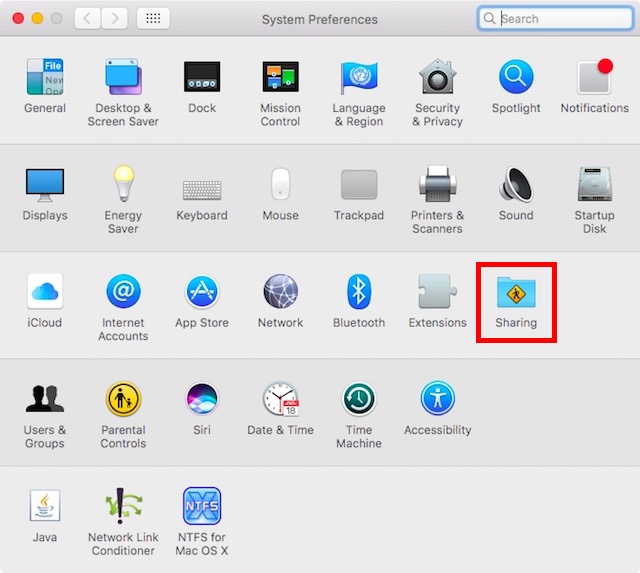
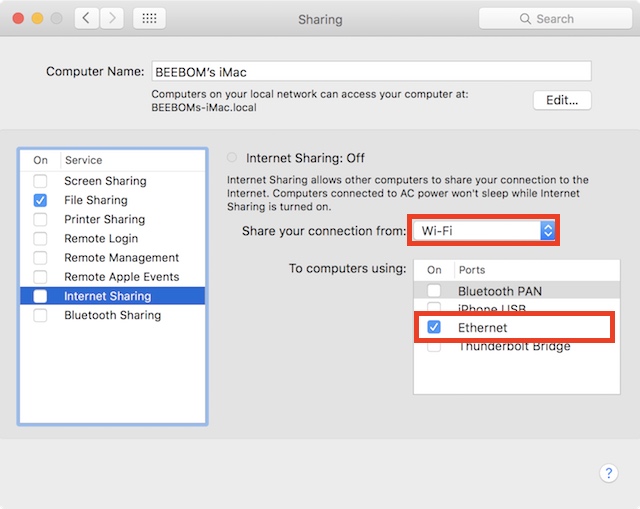
- First, launch System Preferences on your Mac, and go to “Sharing“.
- Here, click on “Internet Sharing“. Make sure you don’t check the checkbox next to it, yet. Then, select “WiFi” from the dropdown menu that says “Share your connection from“, and check the checkbox next to “Ethernet“, under “To computers using“.
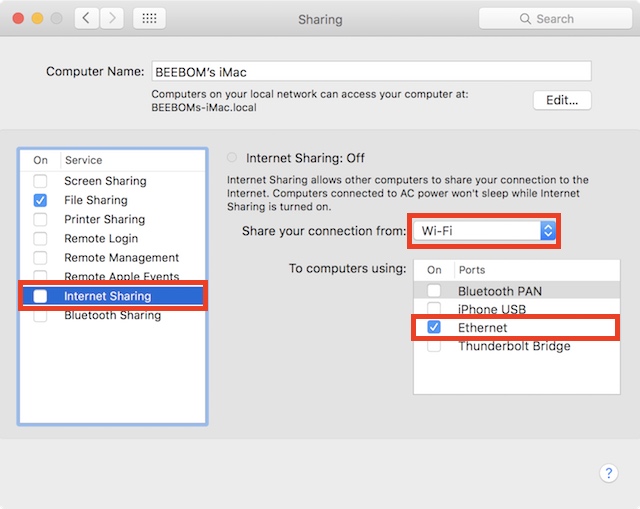
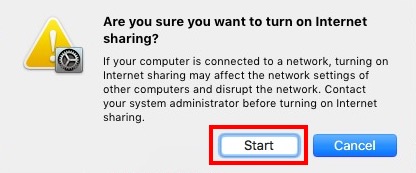
- Now, check the checkbox next to “Internet Sharing“, and click on “Start“, in the dialog box that appears.
That’s basically all you need to do. You can now plug an Ethernet cable into your Mac, and the laptop that you want to share your connection with, and it’ll simply work.
2. Share Ethernet Connection from your Mac over WiFi
It would be more useful, if you could connect your Mac to Ethernet, and then share that connection over WiFi, wouldn’t it? Well, fortunately, you can do that easily, as well. The process is similar to sharing your WiFi over Ethernet; however, in the second step, you’ll have to select “Ethernet” in the drop down menu that says “Share your connection from”, and check the checkbox next to “WiFi”, under “To computers using”.
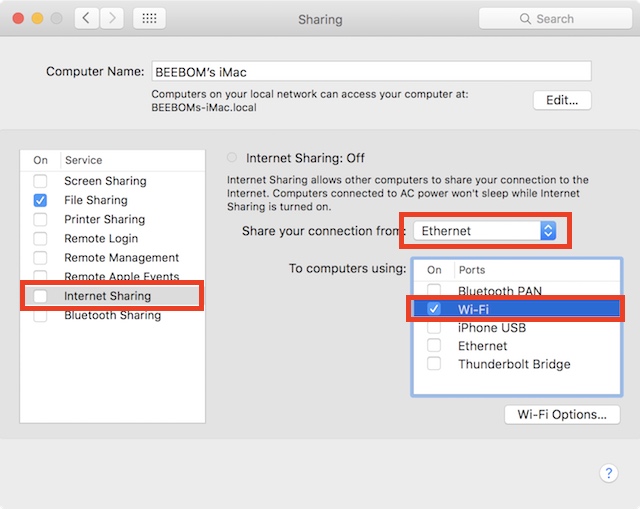
Your Mac will now begin sharing your Ethernet connection over WiFi, and you can simply join the network on any device that has WiFi support. If you want to protect your WiFi network, you can simply click on the “Wi-Fi Options” button, in Internet Sharing, and set up a password.
3. Share your iPhone’s Connection over Ethernet
Another cool thing you can do, is share the Personal Hotspot on your iPhone, over Ethernet, using your Mac. This is also very simple, and the steps are much the same as the previous ones, but for the sake of clarity, I will be walking you through the process, step-by-step:
Note: There are three ways that you can share your iPhone’s Personal Hotspot with your Mac; you can connect to it using Bluetooth, you can connect to it using the iPhone’s USB cable, or you can simply share it using WiFi. This particular section is useful for sharing your iPhone’s internet to other devices that do not support WiFi… like an old desktop PC. You can even use this to share your iPhone’s connection to a router, and connect multiple devices with the router using Ethernet cables.
Share iPhone’s Personal Hotspot via Bluetooth
If you want to share your iPhone’s Personal Hotspot to your Mac using Bluetooth, and then share that over the Ethernet, here is how you can do it:
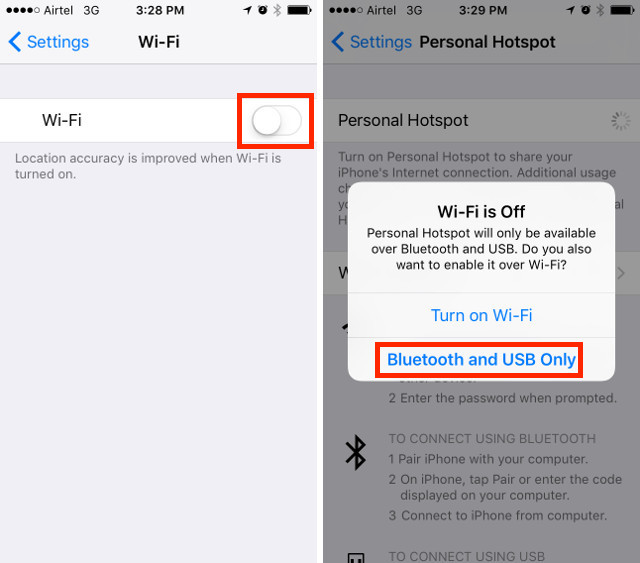
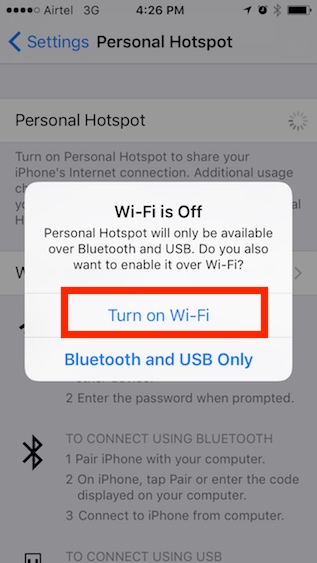
- First, on your iPhone, turn off WiFi, and turn on “Personal Hotspot”. It will ask you whether you want to turn WiFi on, or just share the connection over Bluetooth and USB. Tap on “Bluetooth and USB Only“. Make sure that Bluetooth is turned on, on your iPhone.
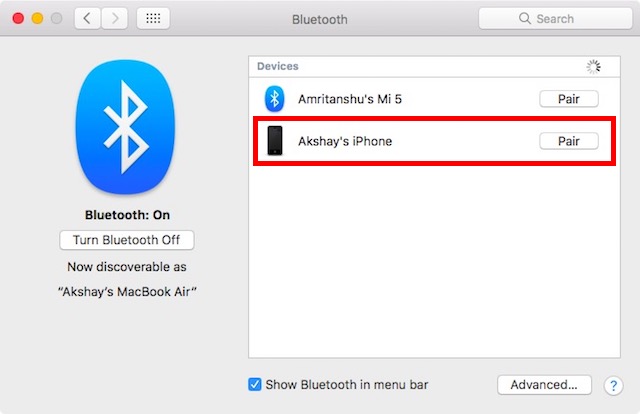
- Next, on your Mac, go to System Preferences, and click on “Bluetooth“.

- Here, wait till your iPhone appears, and then click on “Pair“.
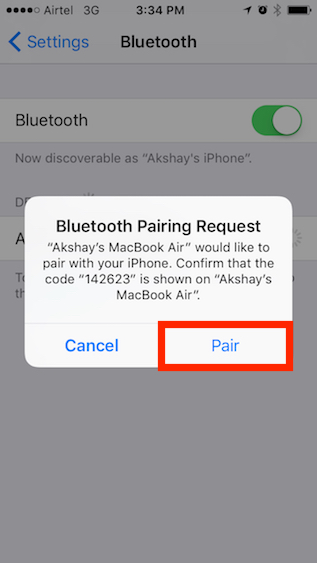
- On your iPhone, you will see a prompt, with the pairing confirmation. Tap on “Pair“.
- Now, in System Preferences, go to “Network”, and click on “Bluetooth PAN”. You will see your iPhone’s name here, click on “Connect“.
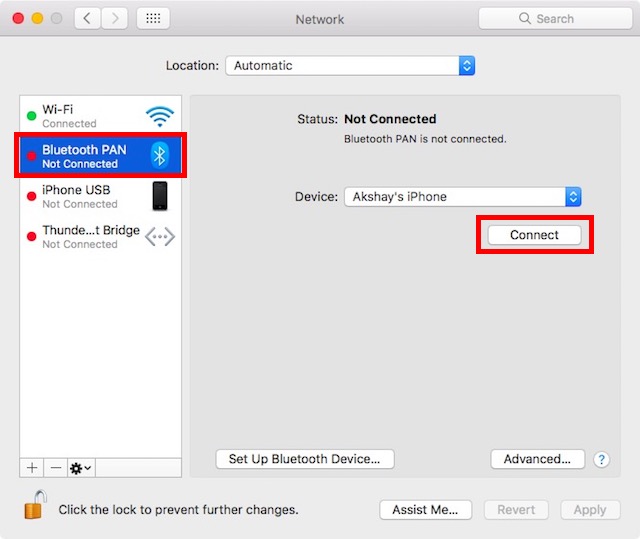
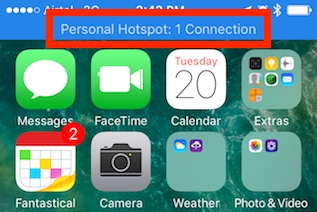
- You will then be able to see a blue banner on top of your iPhone saying “Personal Hotspot: 1 Connection“. This means that your Mac is connected to your iPhone’s network. Now, it’s time to share this connection over the Ethernet.
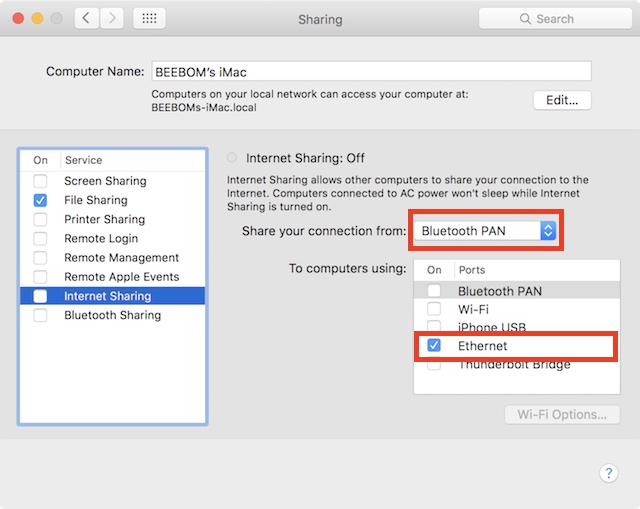
- Go to “System Preferences“, and click on “Sharing“.
- Here, go to “Internet Sharing“, and select “Bluetooth PAN” in the dropdown menu that says “Share your connection from“, and check the checkbox next to “Ethernet“, under “To computers using“.
Now, you can check the checkbox next to “Internet Sharing“, and click on “Start” in the dialog box that appears. Your Mac will start sharing your iPhone’s Personal Hotspot over the Ethernet, and you can connect the Ethernet cable from your Mac, to the device you want to share your connection with.
Share iPhone’s Personal Hotspot via USB Cable
If you want to share your iPhone’s Personal Hotspot to your Mac using a USB Cable, and share that connection over the Ethernet, you can do that, as well. Simply follow the steps below:
- On your iPhone, turn on Personal Hotspot, and tap on “Bluetooth and USB Only“. Now, connect your iPhone to your Mac, via the USB Cable.
- You will now be able to see a blue banner on your iPhone, saying “Personal Hotspot: 1 Connection“.
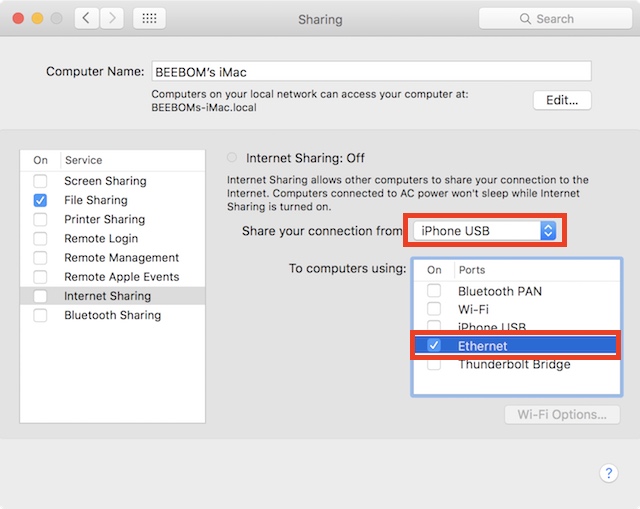
- Now, go to System Preferences, and click on Sharing.
- Here, under Internet Sharing, select “iPhone USB” in the drop down menu that says “Share your connection from”, and check the checkbox next to “Ethernet“, under “To computers using“.
Your Mac will now start sharing your iPhone’s Personal Hotspot over the Ethernet, and you can connect an Ethernet cable from your Mac, to the device you want to share the connection with.
Share your iPhone’s Personal Hotspot via WiFi
Another way you can connect your iPhone’s Personal Hotspot to your Mac, is via WiFi. You can then share this connection to other non-WiFi enabled devices, by sharing it over the Ethernet. To do this, just follow the steps below:
- On your iPhone, enable Personal Hotspot, and tap on “Turn on WiFi“.
- Then, connect your Mac to your Personal Hotspot over WiFi. Once you have done that, go to System Preferences, and click on “Sharing“.
- Here, select “WiFi” in the drop down menu that says “Share your connection from“, and check the checkbox next to “Ethernet“, under “To computers using“.
You will now be able to share your iPhone’s Personal Hotspot with other devices that don’t have WiFi capabilities. If the other devices also have WiFi capabilities, you can directly connect them to your iPhone’s Personal Hotspot, which is far easier than setting up Internet Sharing.
SEE ALSO: How to Check Battery Time Remaining in macOS Sierra 10.12.2
Share Internet from Mac to Other Devices via Ethernet or WiFi
You can use these methods to share your Mac’s internet connection with other devices over WiFi, or Ethernet. We tried these methods on an iMac running macOS Sierra and they worked fine for us.
While it was possible, earlier, to share internet from your Mac, over Bluetooth, that option no longer seems to work, which is why we haven’t covered it in this article. However, if you know of any way to make reverse tethering over Bluetooth work on a Mac, do let us know about it in the comments section below.


 Sagnik Das Gupta
 Kanika Gogia
 Kanika Gogia
 Satyam Kumar
 Kanika Gogia
![How to Change MacBook Wallpaper [2024 Guide]](https://beebom.com/wp-content/uploads/2024/02/Macbook-wallpaper.jpg?w=300&quality=75) Kanika Gogia
Kanika Gogia
 Kanika Gogia

I would like to connect one of my Amiga desktops to the Internet through my Macbook Pro, which runs OS 10.11.6. Will I be able to connect my Amigas to the Internet via method #1?
I live in a wi-fi environment and my Amigas both have Ethernet ports. I bought a crossover Ethernet cable. I have D-Link AC1200 Range Extender with multiple Ethernet ports on it.
How did you do all of that without once checking the Network Preferences pane (and ifconfig, or ipconfig for that matter, in Terminal)? I don’t know what state your Ethernet connection is in, while sharing WiFi (en1) to Ethernet (en0).
I have tried numerous things, even with traffic coming and going on en0 (en1 has the Internet connection), but no DHCP setting the secondary computer, and not working with a manually IP address, and don’t get me started on IPv6, which has done nothing for me.
Still no connection between the iMac and PC on my desk, despite the devices saying “connected” at 1000 Mbps. I do not want to active yet another WiFi device in this room, nor to waste money and electricity on a network switch.
After 45 mins on the phone with AppleCare, they still cannot figure out why my iPad is saying “no internet connection” on the network it’s picking up from my brand new iMac with Sierra. The iMac, contrary to that message, DOES have an internet connection–via Ethernet–and it is working just fine (as evidenced by the fact that I am reading this article on it). And the sharing icon on the top of my desktop screen shows that sharing is activated (arrow pointing up), as it always did on my old iMac. I have never had any problem sharing from my old circa 2007 iMac to my iPad Mini 2 in the past and I can’t figure out why it is not working right with this new iMac. An iPhone that previously had no trouble picking up the sharing wifi signal from my old iMac also shows the same “no internet connection” message. At the moment I am updating my iPad from iOS 10.0.2 to 10.2, in case that makes any difference…..any and all suggestions appreciated. I have been using the sharing feature for many years without a hitch and can’t nail down out why it is not working properly now! Any and all suggestions appreciated.