


Google’s Gmail needs no introduction. It is the most used email service on the planet and there are a number of reasons for that. It brings a simple yet appealing interface, there are plethora of extensions that improve Gmail’s functionality and it packs in a lot of features. In fact, Gmail packs in a lot more than what meets the eye. Yes, there are certain great Gmail tricks that not many people are aware of. So, if you are a Gmail user, here are 12 cool Gmail tricks that you should know about.
Cool Gmail Tricks You Should Use in 2019
1. Enable Preview Pane
Preview pane is a much loved feature in Outlook but not many people know that the feature is available in Gmail as well. Preview Pane brings an additional pane to your Inbox, so that you can view your emails right in the inbox. This is certainly handy because if you want to shuffle through multiple emails in Gmail, you will have to open an email, go back and then open the next one. Well, that changes with Preview Pane.
To enable the Preview Pane, head to Gmail settings by hitting the settings cog icon on the top right and selecting ‘Settings’ from the drop down menu.
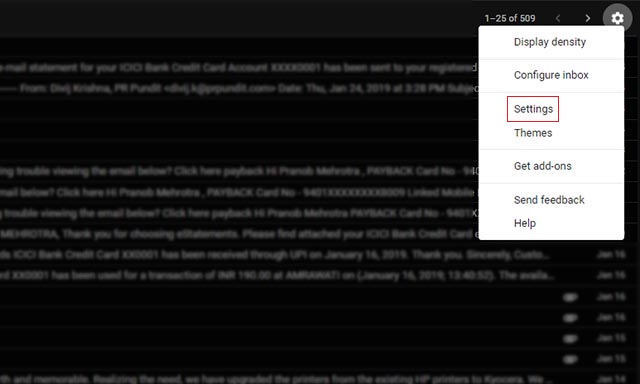
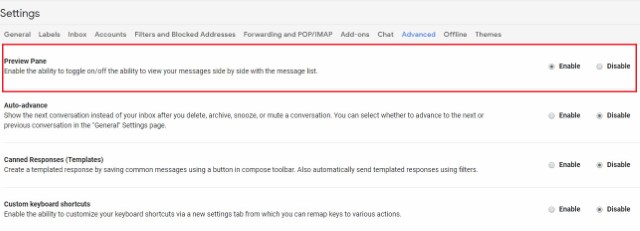
In the Settings menu navigate to the ‘Advanced’ tab and scroll down to locate the ‘Preview Pane’ option. Just select ‘Enable’ and click on ‘Save Changes’.
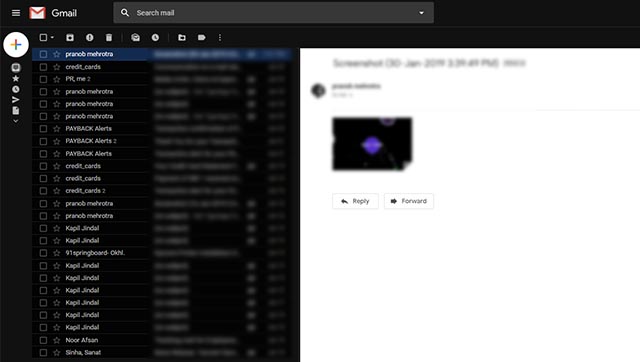
Then, Gmail will reload and you will find a new icon next to the Setting icon. You can click on the icon and from the drop-down menu you’ll be able to choose either ‘Vertical Split’ or ‘Horizontal Split’ for the Preview Pane.
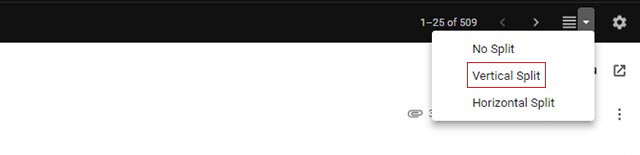
I personally prefer the Vertical Split view, but you can also select the Horizontal Split view option if you prefer that. The advantage of using the Vertical Split view is that it’ll show you a larger number of mails in your inbox, while the Horizontal Split view will show a lesser number of mails as the Preview Pane will occupy most of the space.
I think Gmail should allow this by default. However until it does that, it remains one of my most favorite Gmail tricks that one can use.
2. Use Different Colored Stars
I’m sure you are aware of the ability to star emails in Gmail but chances are, you do not know the fact that there are more stars other than the yellow star. Yes, that’s right! To enable more stars in Gmail, you can head to Gmail Settings. Here, scroll down in the “General” tab to find the “Stars” section. Then, you can just drag and drop different stars to the “In Use” section to enable them. When you are done, just hit the “Save Changes” button at the bottom.
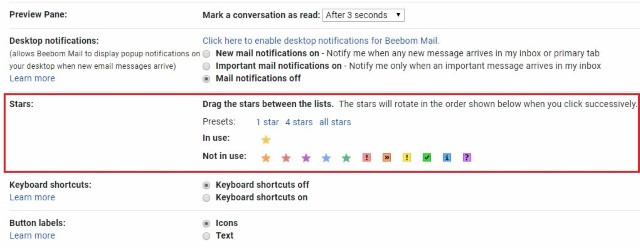
Now, you can click on the star icon next to emails multiple times to get the different stars. You can use different colored stars to mark emails as important, urgent or something you are done with. For instance, you can use the red star for urgent emails, yellow star for important emails and green stars for emails you are done with, but want them in the “Starred” section.
3. Set Send Cancellation Period for Sent Mails
As you’d already know, Gmail allows you to undo sent emails which is a boon if you’re clumsy and tend to make typos quite often. The undo send option allows you to revert back a sent email for a set amount of time after you first send it, but did you know that you can customize the cancellation period as per your needs?
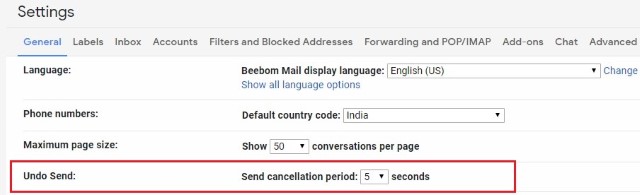
In order to set the cancellation period for sent mails, head to Gmail settings and locate the ‘Undo Send’ option in the General Tab. The option allows you to set a send cancellation period from 5 seconds to 30 seconds. It’s set to 5 seconds by default, but if you want to be on the safe side I’d recommend you to set it to 30 seconds so that you have an ample amount of time to undo the sent mail.
4. Create Disposable Email Aliases for Sign Ups
While you can set up email aliases to sign up to different services and websites, there’s an even simpler way to create disposable email addresses and make sure emails from sign ups land up in spam. Well, it’s easy, if your email id is “example@gmail.com“, you can just use “example+website@gmail.com” as your disposable email address. Gmail does not consider any text after “+” as email addresses, so when you get an email on example+website@gmail.com, it’ll land up in example@gmail.test.
So, when you’ve signed up to a service you don’t want to receive emails from, you can set up a filter that makes sure emails to the disposable address automatically get archived.
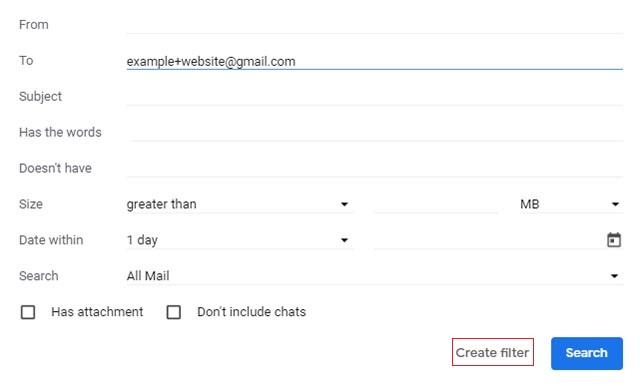
All you need to do, is hit the drop-down button in the Gmail search bar. In the advanced search page, type in the example+website@gmail.com address in the “To” section and then, click on the “Create filter” option.
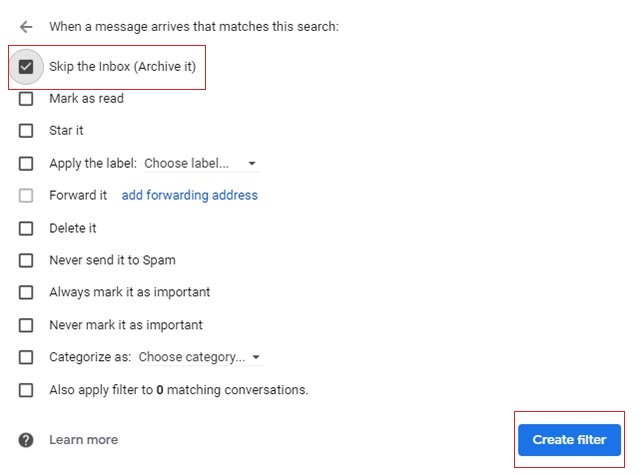
In the next page, you can choose the option to “Skip the Inbox (Archive it)” or “Delete it” and click on “Create filter“. That is it, now whenever you receive an email on the disposable address, it will be automatically deleted or archived.
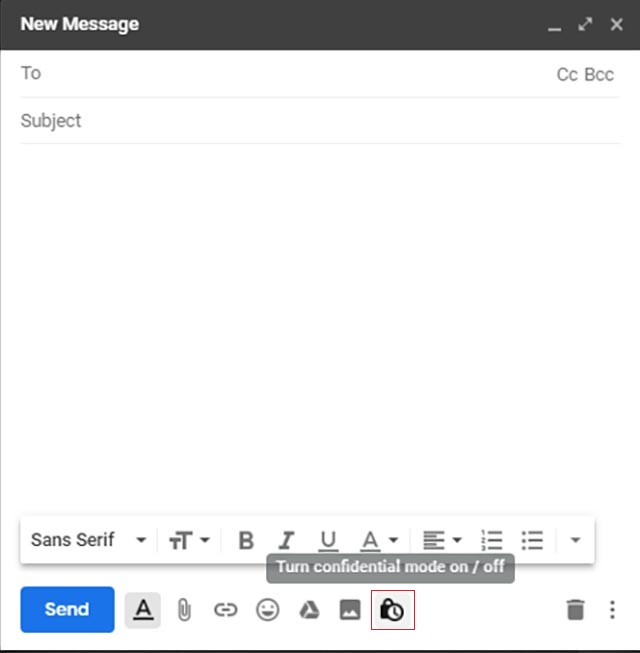
5. Send Encrypted Emails with Confidential Mode
Alongside the redesign last year, Gmail rolled out a new Confidential Mode which allows you to send encrypted emails to prevent sensitive information from falling into the wrong hands. In order to use this feature, tap on the ‘Compose’ button to create a new mail and click on the new lock with a clock icon in the toolbar below to enter Confidential Mode.
In the pop-up Confidential Mode menu you’ll be able to set an expiration date for your email and choose whether the recipient would need a passcode to open your email. You can choose an expiration date anywhere from a day to 5 years for a mail, depending on when you want the sent email to automatically delete from the recipient’s inbox.
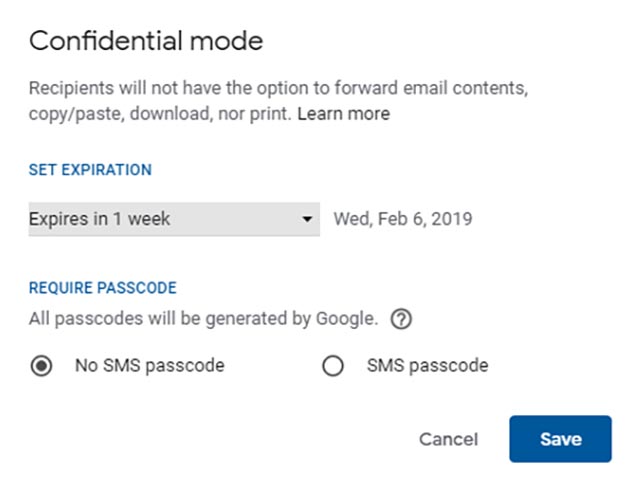
As for the passcode requirement, you can select the SMS passcode option and enter the recipient’s phone number. The recipient will automatically receive the passcode when they try to open the mail. Once you’ve set all the details and saved them, you can type out your email as usual and send it.
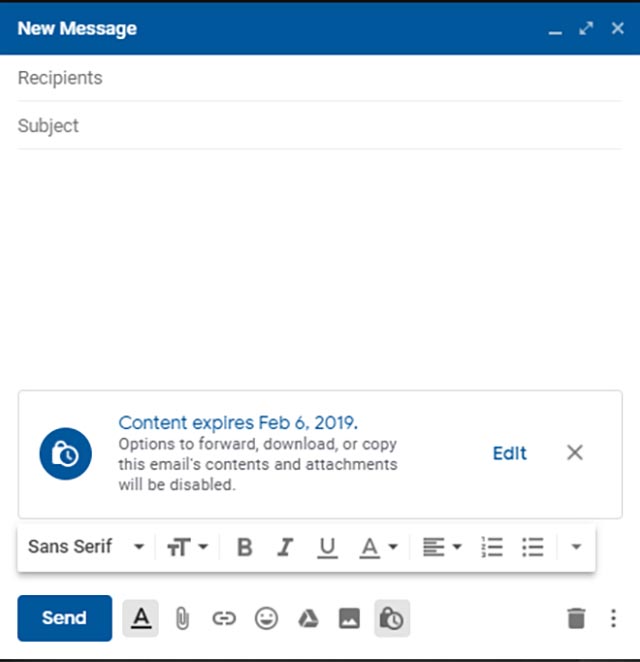
Using the Confidential Mode not only encrypts your email, it also prevents the recipient from forwarding, copying, downloading or printing the contents of the email. If you are concerned about your privacy, this is one of the best Gmail tricks for you.
6. Set Up Canned Responses
Gmail also allows you to set up Canned Responses (templates) which can really come in handy if you’ve ever found yourself typing out the same response again and again for a number of different emails. To set up a canned response, navigate to Gmail settings and select the ‘Advanced’ tab in the settings menu.
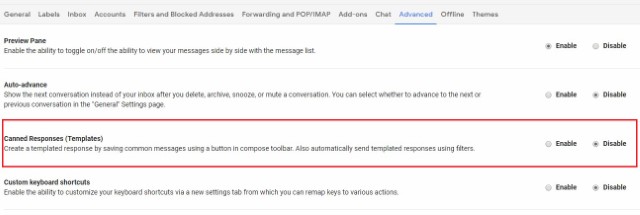
Scroll down to the ‘Canned Responses (Templates)’ option in the menu and enable it. Once enabled, tap on ‘Save Changes’ and now you’ll be able to create a canned response. To create a new canned response, click on the compose button and then type out your canned response. Once you’ve drafted the response, click on the menu button to the right of the trash icon and navigate to the ‘Canned responses’ option.
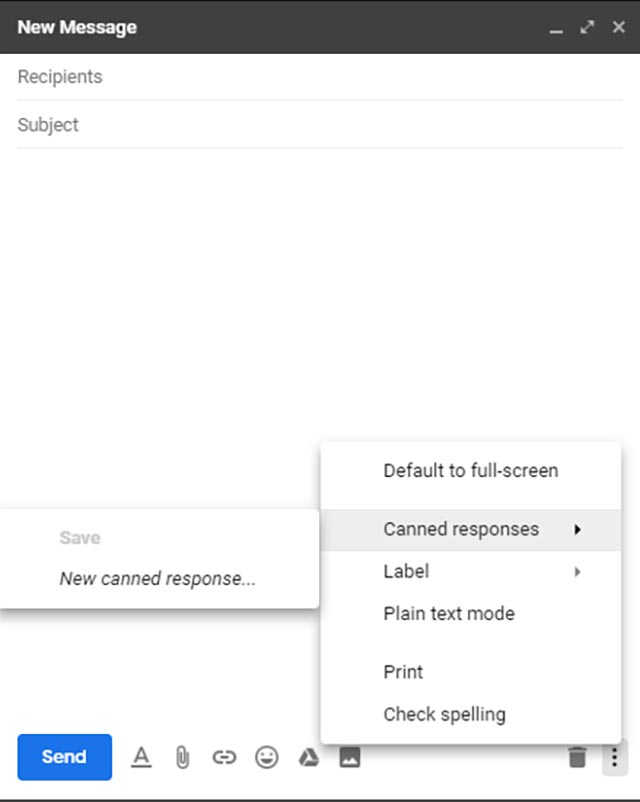
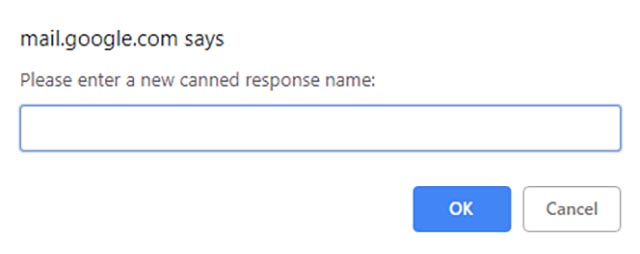
Select ‘New canned response’ from the menu and enter a title for the canned response in the pop-up window and hit ‘OK’. This will set up a canned response that you can use to reply to emails.
In order to use already set up canned responses, click on the compose button and then click on the same menu button to the right of the trash icon. In the pop-up menu, navigate to ‘Canned responses’ and select the canned response you just set up. You can also delete old canned responses from the same menu.
7. Setup Mail Delegation
Not many people know about Gmail’s Mail Delegation feature, which is shame because it’s really handy. The feature lets you grant access to your Gmail account to multiple people, without you having to share your password or other details. Plus, the delegates only get limited access to your account. A delegate can send or reply to emails sent by you, read your emails, delete emails and manage contacts. However, a delegate can’t change your Gmail password, account settings or chat with anyone.
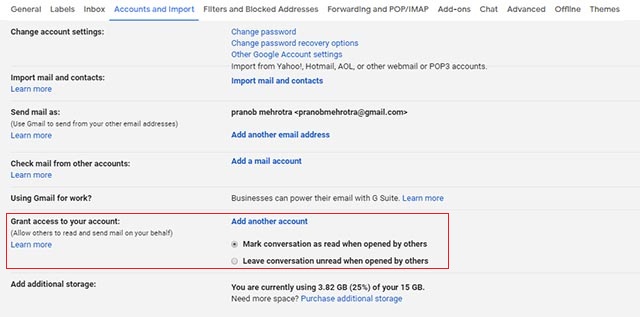
To add a delegate, head over to Gmail Settings. Then, head to the “Account and Import” tab and in the“Grant access to your account” section, click on “Add another account“.
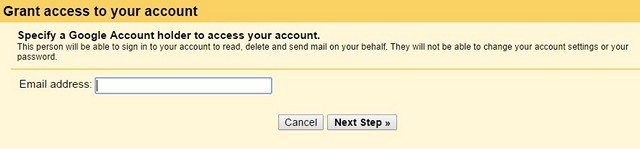
Then, you will have to enter the email address of the person you want to add as delegate. After you’ve entered, click on “Next Step“.
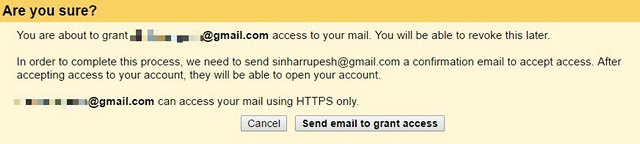
Then, click on “Send email to grant access“, after which an email will be sent to the email address you entered. The recipient will have to accept the invitation from the email. Once done, it should take a few hours before the delegate can access your account.
Note: Gmail users can only add 10 delegates but if you are using a Google apps Gmail account, you can add 25 delegates but these delegates can be only from the same organization as you. Also, some companies disable the delegation feature.
8. Track Emails and Check Who’s Tracking You
There are times when you send out an important email but you’re worried if the email has been read or if it landed in spam. Well, worry no more, because there are several extensions for Gmail that let you track emails aka bring you read receipts.
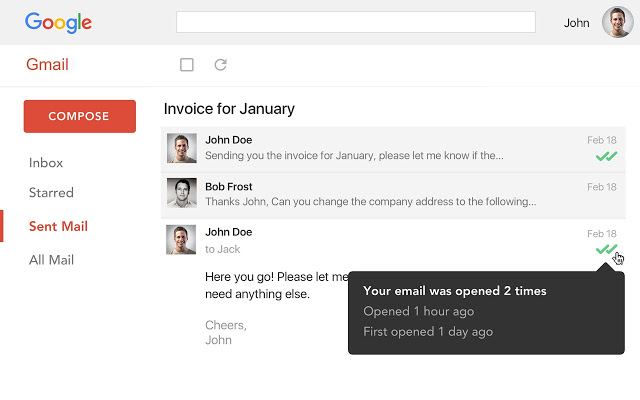
If you just want to keep a check on the emails you’ve sent, you can install the Mailtrack extension, which lets you track unlimited emails in the free version. You can just install the extension, give it the permissions and you are good to go. It works automatically and you don’t have to do anything. I also like the checkmark icons on your sent emails, which tell you if the email has been read or not. You get notifications when your email is read. The only caveat with Mailtrack is the fact that it does not let you disable tracking for specific emails.
9. Move Chats to the Right
The usual Gmail inbox interface can seem to be quite busy, especially the left side, which can really put you off. The left side of the inbox features the various labels and the chats below. However, you can move the chats to the right side, making up for a much more cleaner look.
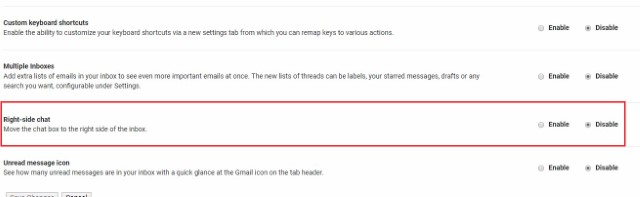
To do this, head to Gmail settings and open up the ‘Advanced’ tab. Here, find the ‘Right-side chat’ option and enable it. Once done, click on ‘Save Changes’ which will reload Gmail.
Once reloaded, you’ll notice that the chat box has moved to the right side, giving your inbox a cleaner look.
10. Forward Multiple Emails
Gmail, by default, does not let you forward multiple emails, which is a shame because there are times when you have to forward several emails to a person. Well, as you might have guessed, there are ways to forward multiple emails in Gmail. You can check out our detailed article on how to forward multiple emails in Gmail to know about the best ways to do it.
11. Advanced Gmail Search
Gmail features some great search capabilities, which is certainly not a surprise, considering it’s a Google offering. You can search for emails in Gmail through size, date, file name of attachments, read or unread state, people, content etc. For instance, you can type “larger: 5 MB” to search for emails that more than 5 MB in size. You can type “filename:pdf” to search for PDF files with the entered file name. These search parameters even work on the Gmail app, which is great.
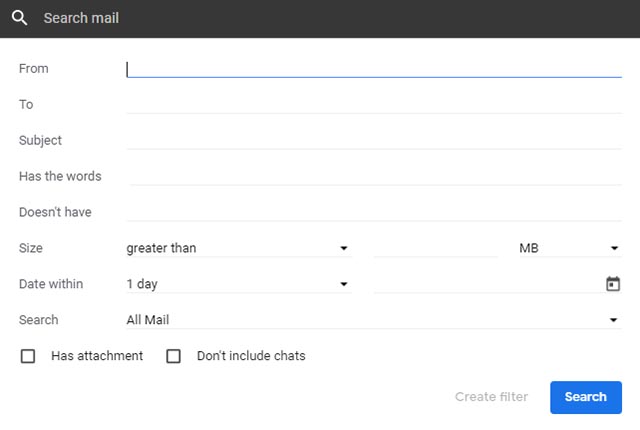
You can hit the drop-down button in the search barto open up a more advanced search option. Here, you can search based on who the email is from, the words in the email, attachments etc. You can even create a filter with this search.
12. Get Notifications for Specific Labels Only
If you receive a lot of emails in a day, notifications from the Gmail app on your iPhone/iPad or Android device can be quite annoying. Thankfully, in the Gmail app, you can make sure to receive notifications from only specific labels. This way, you can make sure you can disable the notifications from labels like Promotions, Spam etc.
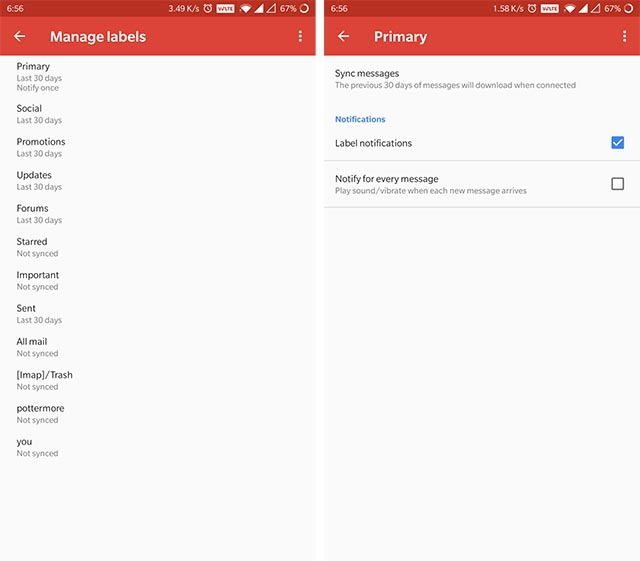
To do this on Android, head to the settings menu in the Gmail app and tap on the account you wish to manage. In the following menu, tap on ‘Manage labels’ and then select the label you wish to wish to modify. In the following menu, tap on the check box next to the ‘Label notifications’ option to enable or disable notifications for that particular label.
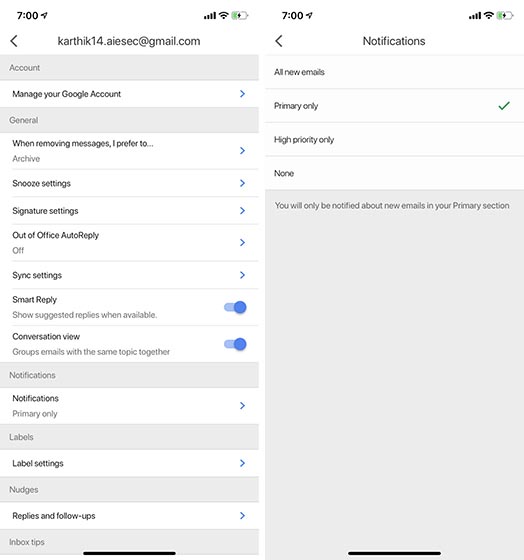
On iOS, you can select if you want notifications for ‘All New Mail’, ‘Primary only’ ‘High priority only’ or ‘None’.
SEE ALSO: How to Schedule Emails on Gmail for Free
Ready to Try Out These Gmail Tricks
Well, those were 12 Gmail tricks that should surely enhance your email experience on the Google platform. You can try them out and let us know the ones that you found helpful. Also, if you know of any other cool Gmail tricks that we might have missed out on, let us know in the comments section below.


 Abubakar Mohammed
 Arjun Sha

 Shashank Shakya

 Anshuman Jain
 Abubakar Mohammed
 Abubakar Mohammed


don’t uuuuuuuuuuuuuggggggggghhhhhh this website for your mistake of clicking on this website even though it said gmai not google hangout
u7uuuuuggggggggghhhhh I know this alredy I wa looking for google hangout not gmail uuuuuggghhhh
I love learning new tricks for Gmail. I just wish someone would develop an app or extension to help sort by sender so I can then choose them all and file them much easier than having to open every single email just to file it. It seriously is a waste of hundreds of hours.
nice
A good read indeed to improve your expertise on Gmail. Features like “Undo” are godsend through which you can recall your emails which you have sent. Looking for more posts like this from you, Rupesh.
I Can’t See label In G Mail Setting Any Idea
12 Cool Gmail Tricks You Did Know About
OR
12 Cool Gmail Tricks You Didn’t Know About
Who uses GMail in these days? Almost 10% of the people have moved to inbox.google.com and the remaining will move soon 😛